


credits: tensorflow.org
If you are a beginner in Machine Learning and want to get started with developing models in the browser this is for you, if you already know about the TensorFlow Python wrapper and want to explore TF.js you have come to the right place! Unlike of traditional blogs, I believe in hands-on learning and that is what we will do here.
All the code is available here- Rishit-dagli/Get-started-with-TF.js A simple repository to get started with TF.js and start making simple models - Rishit-dagli/Get-started-with-TF.jsgithub.com
What you can do with TF.js?
- Run existing models
With TF.js you can use off-the-shelf JavaScript models or convert Python TensorFlow models to run in the browser or under Node.js very easily and still have all the capability.
- Retrain existing models
Retrain pre-existing ML models using your own data. If you think this is something like Transfer Learning, yes it is but in the browser itself.
- Develop ML with JavaScript
And finally here is the best part you can build and train models directly in JavaScript using flexible and intuitive APIs just like you would do in Python with some different keywords of course.
- Supports almost everything!
TF.js supports development with almost any library, Before you ask me in February, 2020; the TensorFlow team announced support for React Native too and this can get you anywhere.
This features are just a summary of TF.js and make it indispensable.
What you need?
All you would need to follow me is latest version of chrome and a text editor of your choice. That is it.
Let’s Start!
We will start by creating a simple HTML page and adding JavaScript to it.
- Copy the following code into an HTML file called
index.html
<!DOCTYPE html>
<html>
<head>
  <title>TensorFlow.js Tutorial</title>

  <!-- Import TensorFlow.js -->
  <script src="https://cdn.jsdelivr.net/npm/@tensorflow/tfjs@1.0.0/dist/tf.min.js"></script>
  <!-- Import tfjs-vis -->
  <script src="https://cdn.jsdelivr.net/npm/@tensorflow/tfjs-vis@1.0.2/dist/tfjs-vis.umd.min.js"></script>

  <!-- Import the main script file -->
  <script src="script.js"></script>

</head>

<body>
</body>
</html>
- Copy this code in a file called
script.js
console.log("Hello Home");
Run the index.html file in the web browser. If you use Chrome- Ctrl + Shift + I
For other browsers find the developer tools option. In the console you can now see, Hello Home and two runtime variables tf and tfvis .
Load data and create some visualizations
We will now create a model and work with it. We will be using “cars” data set for this tutorial. It contains many different features about each given car. We want to only extract data about Horsepower and Miles Per Gallon. So, we will add this code to script.js
/**
 * Get the car data reduced to just the variables we are interested
 * and cleaned of missing data.
 */
async function getData() {
  const carsDataReq = await fetch('https://storage.googleapis.com/tfjs-tutorials/carsData.json');
  const carsData = await carsDataReq.json();
  const cleaned = carsData.map(car => ({
    mpg: car.Miles_per_Gallon,
    horsepower: car.Horsepower,
  }))
  .filter(car => (car.mpg != null && car.horsepower != null));

  return cleaned;
}
Let’s now create a visualization, a scatter plot for the data with this code added to script.js
async function run() {
  // Load and plot the original input data that we are going to train on.
  const data = await getData();
  const values = data.map(d => ({
    x: d.horsepower,
    y: d.mpg,
  }));

  tfvis.render.scatterplot(
    {name: 'Horsepower v MPG'},
    {values},
    {
      xLabel: 'Horsepower',
      yLabel: 'MPG',
      height: 300
    }
  );

  // More code will be added below
}

document.addEventListener('DOMContentLoaded', run);
When you refresh the page now, you would be able to see a cool scatter plot of the data
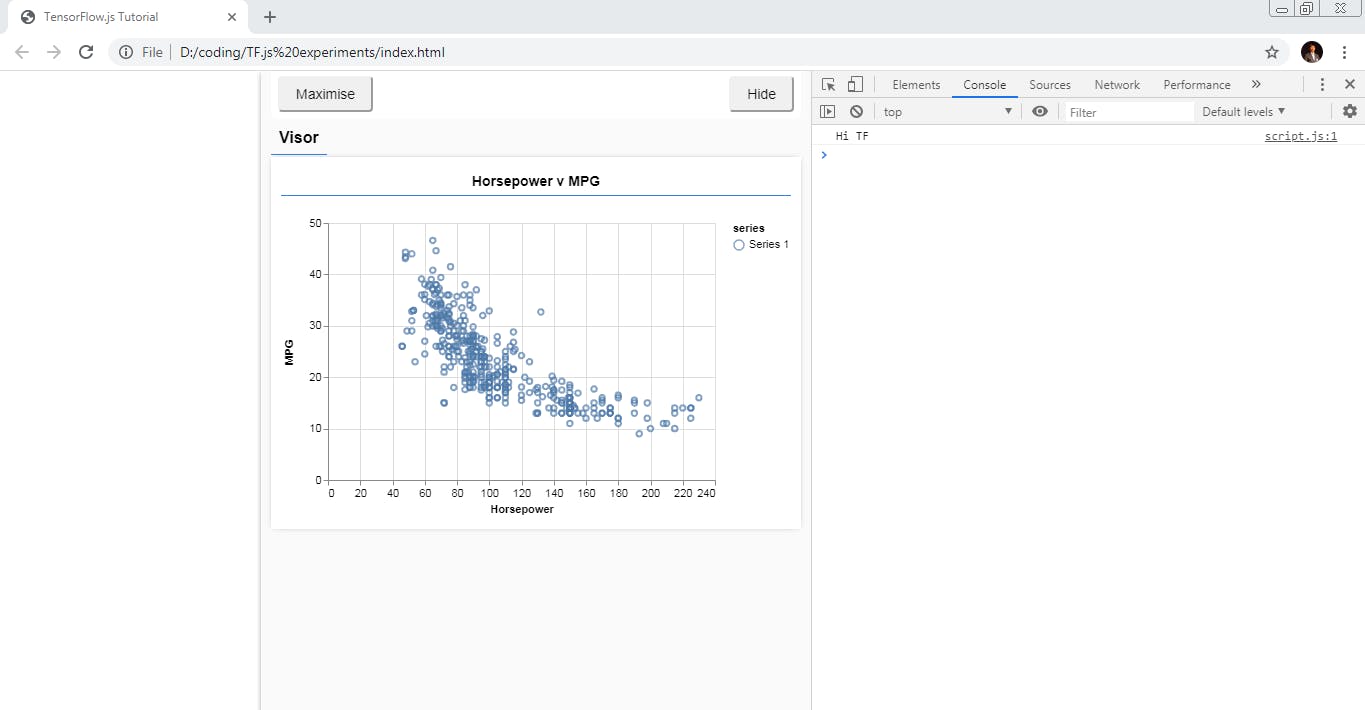 Scatter plot of the data
This panel is known as the visor and is provided by tfjs-vis. It provides a easy ans wonderful place to display visualizations. Our goal is to train a model that will take one number, Horsepower and learn to predict Miles per Gallon. Let;s now see how we will do this, I expect you to know the basics about supervised learning and neural networks.
Model
This is the most interesting section where you will be trying and experimenting for yourself. Let’s now go about this. If you do not know about neural nets, it is an algorithm with a set of layers of neurons with ‘weights’ governing their output. The training process of this neural net learns the ideal values for those weights to get the most accurate output. Let’s see how we can make a very simple model-
function createModel() {
  // Create a sequential model
  const model = tf.sequential();

  // Add a single input layer
  model.add(tf.layers.dense({inputShape: [1], units: 1, useBias: true}));

  // Add an output layer
  model.add(tf.layers.dense({units: 1, useBias: true}));

  return model;
}
We will now break this down and understand each bit of it.
const model = tf.sequential();
This instantiates a [tf.Model](js.tensorflow.org/api/latest/#class:Model) object. This model is [sequential](js.tensorflow.org/api/latest/#sequential) because its inputs flow straight down to its output. This might seem similar to you if you have worked with the Python wrapper.
model.add(tf.layers.dense({inputShape: [1], units: 1, useBias: true}));
This adds an input layer to our network, which is automatically connected to a dense layer with one hidden unit. A dense layer is a type of layer that multiplies its inputs by a matrix (called weights) and then adds a number (called the bias) to the result. As this is the first layer of the network, we need to define our inputShape. The inputShape is [1] because we have 1 number as our input (the horsepower of a given car).units sets how big the weight matrix will be in the layer. By setting it to 1 here we are saying there will be 1 weight for each of the input features of the data.
Now we need to create an instance of the model, so we will add this line of code to the run function we made earlier
const model = createModel(); tfvis.show.modelSummary({name: 'Model Summary'}, model);
Now that we have the model we need to prepare our data to feed it in neural network.
Prepare the data
To get the performance benefits of TensorFlow.js that make training machine learning models practical, we need to convert our data to tensors. We will also perform a number of transformations on our data that are best practices, namely shuffling and **normalization. **Add this to the code-
/**
 * Convert the input data to tensors that we can use for machine
 * learning. We will also do the important best practices of _shuffling_
 * the data and _normalizing_ the data
 * MPG on the y-axis.
 */
function convertToTensor(data) {
  // Wrapping these calculations in a tidy will dispose any
  // intermediate tensors.

  return tf.tidy(() => {
    // Step 1. Shuffle the data
    tf.util.shuffle(data);

    // Step 2. Convert data to Tensor
    const inputs = data.map(d => d.horsepower)
    const labels = data.map(d => d.mpg);

    const inputTensor = tf.tensor2d(inputs, [inputs.length, 1]);
    const labelTensor = tf.tensor2d(labels, [labels.length, 1]);

    //Step 3. Normalize the data to the range 0 - 1 using min-max scaling
    const inputMax = inputTensor.max();
    const inputMin = inputTensor.min();
    const labelMax = labelTensor.max();
    const labelMin = labelTensor.min();

    const normalizedInputs = inputTensor.sub(inputMin).div(inputMax.sub(inputMin));
    const normalizedLabels = labelTensor.sub(labelMin).div(labelMax.sub(labelMin));

    return {
      inputs: normalizedInputs,
      labels: normalizedLabels,
      // Return the min/max bounds so we can use them later.
      inputMax,
      inputMin,
      labelMax,
      labelMin,
    }
  });
}
Let’s break this down-
tf.util.shuffle(data);
Here we randomize the order of the examples we will feed to the training algorithm. Shuffling is important because typically during training the dataset is broken up into smaller subsets, called batches, that the model is trained on. This further helps us remove sequence based biasses.
const inputs = data.map(d => d.horsepower)
const labels = data.map(d => d.mpg);

const inputTensor = tf.tensor2d(inputs, [inputs.length, 1]);
const labelTensor = tf.tensor2d(labels, [labels.length, 1]);
Here we first make 2 arrays an input and labels array and then convert it into tensors.
const inputMax = inputTensor.max();
const inputMin = inputTensor.min();
const labelMax = labelTensor.max();
const labelMin = labelTensor.min();

const normalizedInputs = inputTensor.sub(inputMin).div(inputMax.sub(inputMin));
const normalizedLabels = labelTensor.sub(labelMin).div(labelMax.sub(labelMin));
Here we normalize the data into the numerical range 0-1 using *min-max scaling). *Normalization is important because the internals of many machine learning models you will build with tensorflow.js are designed to work with numbers that are not too big. Common ranges to normalize data to include 0 to 1 or -1 to 1 .
return {
  inputs: normalizedInputs,
  labels: normalizedLabels,
  // Return the min/max bounds so we can use them later.
  inputMax,
  inputMin,
  labelMax,
  labelMin,
}
Now we will finally return the data and the normalization bounds.
Concluding
This is not the end, we will explore the next process in a continuation blog. For now we first saw the capabilities of TF.js, we then made some cool visualizations. After which we made a super simple neural network. Then, we saw how we can pre-process the data. Next up we will see how we can train our net and make predictions.
Read the next blog here.
About Me
Hi everyone I am Rishit Dagli
LinkedIn — linkedin.com/in/rishit-dagli-440113165/
Website — rishit.tech
If you want to ask me some questions, report any mistake, suggest improvements, give feedback you are free to do so via the chat box on the website or by mailing me at —
hello@rishit.tech