


Source: Cognitiveclass.ai
Table of contents
All the code used here is available in my GitHub repository here.
This is the fifth part of the series where I post about TensorFlow for Deep Learning and Machine Learning. In the earlier blog post, you saw how you could apply a Convolutional Neural Network for Computer Vision with some real-life data sets. It did the job pretty nicely. This time you’re going to work with more complex data and do even more with the data. I believe in hands-on coding so we will have many exercises and demos which you can try yourself too. I would recommend you to play around with these exercises and change the hyper-parameters and experiment with the code. If you have not read the previous article consider reading it once before you read this one here. This one is more like a continuation of that.
Reading the Data
In the previous blog post, we worked with MNIST data which was pretty simple, grayscaled 28 X 28 images, and the thing you want to classify is centered in the image. Real-life data is different, it has more complex images, your subject might be anywhere in the image not necessarily centered. Our dataset had very uniform images too. This time we’ll also work on a larger dataset.
We’ll be using the Cats vs Dogs dataset to try out these things for ourselves. TensorFlow has something called [ImageDataGenerator](tensorflow.org/api_docs/python/tf/keras/pre..) which simplifies things for us and allows us to directly read the images and place them. So you would first have two directories called train and validation directory, each of the directories would have two subdirectories Cats and Dogs each of which would have the respective images and auto label them for us. Here’s how the directory structure looks-
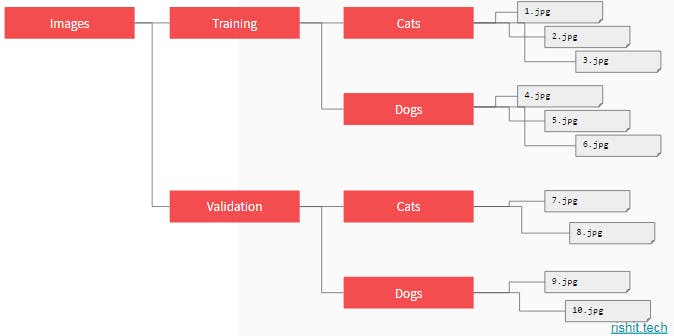 The directory structure
Let’s now see this in code. The ImageDataGenerator is present in tensorflow.keras.preprocessing.image so first let’s go ahead and import it-
from tensorflow.keras.preprocessing.image import ImageDataGenerator
Once you do this you can now use the ImageDataGenerator -
train_image_generator = ImageDataGenerator(rescale=1./255)

train_data_gen =  train_iamge_generator.flow_from_directory(
                    batch_size=batch_size,
                    directory=train_dir,
                    shuffle=True,
                    target_size=(IMG_HEIGHT,IMG_WIDTH)
                    class_mode='binary')
We first pass in rescale=1./255 to normalize the images, you can then call the flow_from_directory the method from that directory and its sub-directories. So in this case taking the above diagram as a reference, you would pass in the Training directory.
Images in your data might be of different sizes to convert or resize them all into one size by the target_size . This is a very important step as all inputs to the neural network should be of the size. A nice thing about this code is that the images are resized for you as they’re loaded. So you don’t need to preprocess thousands of images on your file system you instead to do it in runtime.
The images will be loaded for training and validation in batches where it’s more efficient than doing it one by one. You can specify this by the batch_size , there are a lot of factors to consider when specifying a batch size which we will not be discussing in this blog post. But you can experiment with different sizes to see the impact on the performance.
This is a binary classifier that is it picks between two different things; cats and dogs so we specify that here by the class_mode.
And that’s all you need to read your data and auto label them according to their directories and also do some processing in run time. SO let’s do the same for validation data too-
validation_image_generator = ImageDataGenerator(rescale=1./255)
val_data_gen = validation_imadata_generator.flow_from_directory(
                 batch_size=batch_size,
                 directory= validation_dir,
                 shuffle=True,
                 target_size=(IMG_HEIGHT,IMG_WIDTH)
                 class_mode='binary')
Training the model
Another great thing about ImageDataGenerator is there is little or almost no change while building and training the model, so let's build a sample model for the dogs vs cats problem and then compile it.
model = Sequential([
    Conv2D(16, (3,3), padding='same', activation='relu',
    input_shape=(IMG_HEIGHT, IMG_WIDTH ,3)),
    MaxPooling2D(2,2),
    Conv2D(32, (3,3), padding='same', activation='relu'),
    MaxPooling2D(2,2),
    Conv2D(64, (3,3), padding='same', activation='relu'),
    MaxPooling2D(2,2),
    Flatten(),
    Dense(512, activation='relu'),
    Dense(1, activation='sigmoid')])

model.compile(optimizer='adam',
              loss='binary_crossentropy',
              metrics=['accuracy'])
You can see that you don't have to do any changes while compiling your model to make it work with ImageDataGenerator , let’s get to the training part now.
history = model.fit_generator(
    train_data_gen,
    steps_per_epoch=total_train//batch_size,
    epochs=epochs,
    validation_data=val_data_gen,
    validation_steps=total_val//batch_size
)
A difference you would see here is instead of passing the training data directly after loading it, I now pass the train_data_gen which reads the data from the disk using ImageDataGenerator and performs the transformations on it. And you can do the same with the validation data too.
Trying out for yourself
All the code we just talked about is implemented in this notebook. The model we will build is not yet a perfect or suitable model and suffers from overfitting, we will see how we can tackle this problem in the next blog in this series.
You can use the Open in Colab button to directly open the notebook in Colab or even download it and run it on your system.
About Me
Hi everyone I am Rishit Dagli
If you want to ask me some questions, report any mistake, suggest improvements, give feedback you are free to do so by emailing me at —